Tuesday, March 30, 2010

Ukrainian Easter Eggs


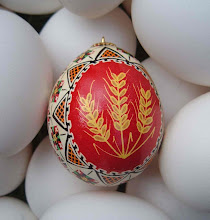
As you might have guessed from my icon, I make Ukrainian Easter eggs.  They're made with a batik process.  That is, part of the shell is protected from the dye with wax, and then the egg is dyed.  I may do this just once, or I may repeat the process with many colors, leaving the wax on the egg until the very end, as it will continue to protect the shell from each new dye.

The second picture shows blackened beeswax on the white shell, and this protected area will stay white, and eventually when the wax is taken off it will be the white areas on the finished egg at the top. Neat, huh? Notice that the black lines in the diamonds on the finished egg were waxed around to leave a space for the black dye.

To draw in a line of wax, a tool called a kistka is used (the Ukrainian word for writing), shown below.  It's a tiny funnel made of brass or copper.  When I made my very first Ukrainian egg I used a fountain pen and melted some beeswax and painstakingly drew the lines.  You could try that if you want to.  Chances are you may find the tools at an art supply store (locally at Artists' Mediums and Bouteliers).  They also sell beeswax that's been blackened, or you can blacken it with kiwi black paste shoe polish (if you're not eating the eggs). The dyes usually sold for Ukrainian eggs are not edible dyes.  If you're going to use this process for edible eggs, make sure you are using food dyes.


I wax and dye the designs on raw eggs, so the eggs will sink in the dye.  If you're only doing a few you might find it easier to blow them out first, and then be prepared to hold floating eggs under the dye. To remove the wax from raw eggs, preheat the oven to 180, stick three thumbtacks in a shirt cardboard to form a triangle, and place the board on a sheet pan.  Place the egg on the tacks horizontally, and heat for about 10 minutes, until the wax is softened but not runny.  Pick up the egg and wipe off the wax with a paper towel.  Turn the egg over and heat for another 7-8 minutes, removing the last of the wax at the end.  It's traditional to leave the raw egg like this, or to cover with a thin film of oil to protect the water-soluble dyes.  It needs to be turned every few weeks if it's in your corner cabinet, because it might explode otherwise.  sigh.  not nice. 

If you've blown out the egg first, the oven only needs to be heated to about 150 or your lowest setting, and only needs to sit in the oven for a couple of minutes before you wipe off the wax from the first side.  Be careful, because the shell will get very hot.

In either case, clean the remaining wax residue off with lighter fluid (naptha), if you plan to varnish it.  If you don't do this, the varnish will yellow pretty quickly from mixing with the wax.  To varnish the egg, put some polyurethane in your hand, and roll the egg around.  Put it back on your thumbtack tripod to dry.  Wipe off as much of the polyurethane as you can, then pour a little vegetable oil in your hands and wash thoroughly with the oil.  Wipe the oil off, and then wash your hands with dish detergent. Magic.  No polyurethane residue.

This shows some eggs drying on a board full of nail tripods (you can see just one of the three nails for each egg).  I dry them upright, so any imperfection from the nail will be at the bottom.  You can easily make a shirt board with several thumbtack tripods, which is what I used to use before I bought this board.


If you've left the egg raw, you can blow it out after you've varnished it (so the egg doesn't mess up the water-soluble dyes).

Many Eastern European countries have a tradition of waxing with a common pin stuck in a pencil eraser, and this is easier to do, if not as exacting (but then, I'm not as practiced.  I used a ball end common pin.  I think there might be control with a "regular" common pin).  You can use paraffin instead of beeswax, and melt a little in a can on the stovetop.  Dip the ball end into the wax, touch it to the egg and drag, and you'll have a little teardrop.  Here's a heart I drew on an egg I'd dyed blue with edible dyes.  After waxing I rinsed off some of the blue dye, so the egg is two shades of blue. You can still see the shiny wax on the egg.


On this next egg I dyed the egg several colors in succession, with edible dyes.  Because the paraffin is so transparent, you can see the colors through the egg really well.  If you were using this way of decorating your hard boiled eggs, you wouldn't even need to bother to remove the wax.  Or you can scrape most of it off with your thumbnail, or remove it in the oven as before.  Do NOT remove the remaining residue with lighter fluid if you're going to eat the egg.

On these two eggs I used white beeswax and a kistka, so the design is finer than with the teardrop and drag method.I drew the design in pencil first, which shows.  When I take the wax off the pencil will come off too.


You can use either of these methods with food dyes to decorate hard boiled eggs, or to decorate eggs for the Easter Egg Nests shown in the previous post.  Be sure to ask me any questions you have in comments, and I'll get back to you.

Easter Eggs in a Nest

Once you've decorated some Easter eggs (see the next post, on instructions for decorating Ukrainian Easter Eggs,  here), you can bake them in a ring of dough to give them their own little nest.

The decorating needs to be done while the eggs are RAW, because you're going to bake them in the dough, and they will otherwise be overdone.  As it is, they will be perfectly "boiled" eggs, but they will have been baked, not boiled.

EASTER EGG BREAD

3 1/2 to 4 cups all purpose flour
1 tsp salt
1/4 cup sugar
1 pkg yeast
1/4 cup canola oil
1 egg
grated zest of 1 lemon optional
water necessary to pull together the dough


I use a food processor, dump in the ingredients, add water as necessary for the dough to form a ball, knead for 45 seconds, remove and let rise in an oiled bowl. 

Let the dough rise, punch down, and let rise again.

It's very advisable for your raw eggs to be decorated already before you make the dough.  Life intervenes, and the dough won't wait for you to decorate eggs, but the decorated eggs can wait for the dough.  It's probably best not to refrigerate the eggs while the dough rises, as the condensation when the eggs come back out of the fridge could make the dyes run - but it's up to you.

When it's ready to make the nests, divide the dough into 10-12 balls. Punch a hole in the dough and enlarge it to form a bagel shape.  You could also make a dough snake and join the ends, but that didn't work very well for me.  The rich dough didn't want to join well, and I had a thin spot on one side and the eggs wanted to fall out of the nest.  not good. 

Place the nest on parchment paper on a pan (or a well-oiled or cornmealed pan), and place the egg into the nest.  It should be sitting up out of the nest about half way.

Preheat the oven to 375 while the dough is rising (for about 20-30 minutes).  Brush the nest with an egg wash of one egg mixed with a few drops of water, and add sprinkles if you'd like.

Bake for 15 minutes.  The egg, as you can see, will be perfectly done. (The interior of the yolk was a little underdone.  It could have used another minute or two.) If prepared ahead the nests need to be refrigerated. 


Sunday, March 7, 2010

Planting tiny seeds


I'm about to start a lot of herbs and flowers with tiny seeds - seeds that are much too small to handle either by hand or with tweezers.  I still want to plant only a controlled number per cell, though, so I want to plant them individually.  The trick is to use a dampened toothpick.  Dip the end of the toothpick in water, touch it to a seed, and then touch it to the potting soil.  Most of the time it will transfer to the potting soil, but occasionally you'll have to wipe it off the toothpick.  Clearly, these are much too small to start in paper towels, too.  They need to be planted directly in germinating mix or potting soil.  They don't need to be covered with more soil!  Very few seeds do.  But you will need to see that the surface of the soil doesn't dry out, either by covering with plastic until some seeds start to germinate, or by misting lightly periodically.

The picture shows one arm of a tweezer with the tip of a toothpick resting on it, with one snapdragon seed on the end of the toothpick.  I've shown one cabbage seed with the snapdragon seeds for comparison

Update:  This is what some of the tiniest seeds look like 3 weeks after planting:

My Car, the Greenhouse

It's 42 today and sunny.  Feels like spring.  Too cold for the seeds I want to sprout, but they would benefit from full sun as soon as they start up, so I'll perch them on the back window ledge in my car.  I'll have to open the window to keep them from getting too warm.  I do this frequently when I need more space under the lights, and just to give the seedlings a better quality of light. If they've only been under indoor flourescents they can burn quite easily, so only a couple hours the first time, or until you know they're fine.  They don't always show a sunburn until the next day, when they'll be white if they've gotten too much sun.

Friday, March 5, 2010

Why These Tomatoes


Sun Gold Tomatoes


Here are the tomato varieties that I'm growing, and why.  Some tomatoes are in more than one list:  If you're planning on canning, all tomatoes except red will need some added acid (like lemon juice, vinegar, or citric acid) if you're canning with a hot water bath (instead of pressure canning).  I think the USDA even suggests adding acid for most modern reds.  I freeze tomatoes quite a bit, and you only need to throw them in a bag or container, so you can freeze the low acid tomatoes too.

Most of these are indeterminates, meaning they will keep growing and producing blossoms and fruits as long as the plant lives.  A few are determinate, meaning they tend to be more bushy, and have a finite fruit set. (beaverlodge plum, roma, rutgers).  In the north this doesn't much matter, as the determinates seldom run out of fruit, and the life of the indeterminates is cut short by frost anyway.  But determinates are more practical if you don't want to stake, and don't want your plants to sprawl all over the ground.

Somewhere in each description there's a link to seeds (and a description there, too).  For some of these tomatoes there are other sources, and some of those are less expensive.

EARLY, AND STARTED EARLY (March 3):

Beaverlodge plum (from Territorial Seeds).  A small plant, and good flavor for such an early tomato.  I can grow them in a pot in the back yard. 2-3 oz

Glacier:  A variety I haven't tried, listed as very early.  3-4 oz

New Girl: An early variety with much better flavor than Early Girl, but otherwise filling that niche.  New Girl is from Johnny's, and they had a seed crop failure this year.  This is one of many reasons to save seeds from year to year, and these are last year's seeds. 3-4 oz

Sun Gold: My wonderful, favorite, fruity, orange cherries (shown above) They are usually the first tomato to ripen in the garden, even though they aren't advertised as early.  I'll probably have ripe cherries the first week of July, on the couple of plants I started yesterday.

RED TOMATOES - STARTING WITH THE LARGEST

Delicious - I haven't grown this variety for a number of years, but it will give me tomatoes consistently more than a pound, with very good flavor. (This variety holds the all-time record for size, at 7 pounds 12oz.)

Burpee's Big Boy - One of two tomatoes I'd grow if restricted to two varieties (the other is Sun Gold). About the first big hybrid, introduced 60 years ago, when flavor was still the primary interest.  Not only is the flavor great, but the aroma is, too. The tomato of my childhood.  10-16 oz, generally. (Usually available locally as a plant- Claussens, at least) Any of the big beefsteaks are pretty similar, except perhaps for aroma.

Supersonic - A sturdy hybrid that's been around a long time.  Good flavor. My friend JP grows this as his primary tomato.  A little smaller than Big Boy, maybe 8-14 oz.

Rutgers:  A non-hybrid, that at one time accounted for 75% of the tomatoes grown in the U.S., so if you're remembering that "old-time tomato flavor" this could be what you remember.  Not quite as productive or disease resistant as hybrids, but worth growing just the same. 6-8 oz.

New Girl, Glacier, Beaverlodge see above

Red paste: Big Mama and Roma, see below

Red Cherry: Super Sweet 100, see below

PINK

Brandy BoyBurpee's hybrid version of Brandywine.  More productive and disease resistant.  Very large fruit with outstanding flavor.  I find them a little temperamental (they don't always ripen properly), or I'd grow more of them, and I have in the past.  The fungal disease we get strips the leaves off plants and without leaves tomatoes can be very acidic, but that is never a problem with pink tomatoes.  Very sweet and meaty.  Another comparable tomato is Rose, from Johnny's, or Pruden's Purple, which is smaller and earlier but with  similar flavor.  Or of course Brandywine, for which you can probably find plants locally. About 16 oz. (but I grew a 36 oz Brandy Boy or Rose a number of years ago). Seeds available on some Burpee seed racks. (Depot Home and Garden, locally)

ORANGE

Jubilee - My favorite orange, but evidently that's an opinion not shared, since I have to hunt for the seeds.  Orange blossom may be available locally and is similar. I use this variety for making orange tomato/orange marmalade.  Along with the pinks and yellows, orange tomatoes have less acid. 6-8 oz.

Sun Gold - See above or below

YELLOW

Yellow Bell - One of my all-time favorite varieties, which was lost to me for a number of years, after it was discontinued by Pine Tree Gardens.  I found it online this spring from Southern Exposure Seed Exchange, and I can't wait to grow it again.  The last time I grew it the tomatoes were plum shaped, and not as flavorful as I remembered, from the pear shaped bells - so there may be some variability in the variety, and I'm prepared to save seeds from the tomatoes I like.  This is not a hybrid, so saving seed will be possible.   Very meaty - essentially a paste tomato -  and it stays on the vine a long time without over-ripening.  3-4 oz

Lemon Boy - A good sized truly yellow tomato, with mild flavor as all yellows have.  May have just a hint of citrus if you use your imagination.  6-10 oz (Usually available locally as a plant- Claussens, at least)

Yellow Pear - A cherry - see below

PASTE TOMATOES (high pulp, few seeds. Ideal for canning)

Big Mama - Burpee's large pendulous paste tomatoUnlike many pastes, it is thoroughly ripe on the inside when it's red on the outside.  Not a lot of fruits, but they are large. 4-8 oz

Roma - Haven't grown this for a while.  Good flavor, though San Marzano's is probably better.  Very productive.  Ripe fruit sometimes drop.  3-4 oz.

Yellow Bell - see above

CHERRY TOMATOES - 
All of these have tender skins, making them available to home gardeners, but not commercially available since they don't ship well.  They also crack easily after a rain, or after picking.  Flavor's great, though.  But if you've become fond of the chewy grape tomatoes you might find the texture of cherries too soft.  You can find grapes to buy, including as plants.  I haven't tried any.

Sun Gold - See description above, too (and picture at the top of the post).  I often just eat these in the garden while I'm working, and I give a lot away (though they do crack easily).  Good over a wide range of ripeness. These will make your friends happy. (Usually available locally as a plant- Claussens, and Gardener's, I think)

Super Sweet 100  - Similar in size to Sun Golds, and similar in flavor too. Not quite as fruity.   The skins tend to be a little tougher than the Sun Golds, and they don't have as wide a range of ripeness.  This is probably what you used to have available to you as a cherry tomato at farm stands. (Sometimes available locally as a plant)

Yellow Pear - A beautiful pear-shaped cherry tomato.  Very prone to splitting.  I got a Burpee cherry mix from the seed rack at Agway, with these 3 varieties in it, and that's a very good mix. - But whether I have any yellow pears will depend on whether I beat the odds when I grow 5 or 6 from the pack.  I have seeds for the other two varieties that I'll grow separately.  It looks nice to have a bowl with all three varieties, or to use all three in a pasta salad, etc.

Wednesday, March 3, 2010

Started Seeds Today March 3rd


(Updates below)
My first seed starting day.  I didn't have time this morning to get germinating mix into the 98-cell tray I start most things in, so I started only those early things I could start in paper towels.  I start in paper towels for several reasons:

1) I can "start" my seeds without having to get everything into soil.
2) I can keep some of the seeds that take a long time to start (like peppers) warm and sterile for much of the time they are germinating (in the case of peppers, about 3 weeks).
3)  I don't have to start extra seeds in each cell and face the dreaded thinning process. 
4) It goads me to start the process.  It takes so little time to start seeds this way, but I know I have to be ready to plant them in soil when the time comes, or I'll lose them.

So I check the seeds every day and see if any have germinated, and plant them just as soon as a root starts to show.  If I forget to do this, I'll easily lose some seeds, since the roots grow long and tangled and into the paper towel, and it's a mess.  No savings, then.  In reality, I don't start checking peppers for about 10 days; I start checking as early as I could possibly find germinated seeds.

I cut paper towels, label with a black sharpie, put a few seeds on the paper towel and fold it up, dip it in water, and store in a plastic bag or plastic container.

Today I started:
Most of my onions (I really didn't need to start in paper towels.  I'll be planting several in a cell, anyway).
Hollyhocks
Asparagus
Rhubarb

A few each of some plants I will start more of later.  The tomatoes will give me just a few plants that will be very early, and I won't be as tempted to start all my tomatoes too early.  Tomatoes and peppers started today will be as big as the nice big plants from Claussens in 4 inch pots.  But they will take a tremendous amount of room by then, and it's a real juggling job if it's cold in May and they have to stay under lights later than I intended:

Solist Chinese Cabbage
Early Green Cabbage
Veronica Romanesco broccoli
Beaverlodge plum tomato
glacier tomato
New Girl tomato
Sun Gold Tomato
Ace Pepper
Jalapeno M Pepper
Mariachi Pepper
Carmen Pepper
March 6 update - Onions, coles, and hollyhocks had sprouted.  Here's what the onions seeds looked like - most are sprouted more than I would have liked.  Should have checked them yesterday.  So I planted them  in 1in cells.


March 7 update- The Soloist Chinese Cabbage is up today.  I'll plant more later, but this gives me just a couple to be really early.